Cooking videos in here

Cooking videos in here
Click the pic to go on my YouTube Channel

Tuesday, 30 July 2013

Greek Style Lamb Sheesh Kabab /Kebab

 
Greek Platter
Greek style rice ~ Lamb Kabobs ~ Pita bread and Tzatziki
 
Lately I have this new obsession to make platters for dinner, I did a Chinese platter, then an Indian one, last week it was Mexican and then I gave this Greek style platter a try, ohh yes we loved it.
Today's post is a lamb kabab /kabob/ kebab, and you can try this marinade with chicken too.
 
I got an email asking me does everything come out so yummy that in every post I say oh yes it was delish, this is too good etc and the answer is yes ! I only post recipes which I feel turn up great and they must be easy to cook.
These Greek style lamb kebabs/ kabobs were super moist and very very flavourful, and if you like lamb please try this one out.
 
You need :
2 cups worth minced lamb
Marinade
1/2 cup mix of coriander and parsley chopped
2 tsp cumin
2 tsp oregano
4/6 mint leaves chopped fine
5/7 medium size garlic
1 tsp crushed red pepper
salt and pepper to taste
1 tsp olive oil
 
For basting the meat while cooking - 1 tsp honey + 2 tsp lemon juice + 2/3 tsp olive oil
Secret ingredient : 1 tsp baking soda (not to miss)
 
Start by making the marinade, in a blender crush everything under Marinade.
Add in half of the minced lamb and give it 2/3 crushes in the blender.Keep the rest aside.
 
Now mix in everything from the blender to the rest of the lamb. Cover with cling and keep in the fridge overnight to make all the flavours well mixed.
 
Soak wooden sticks in water 2 hours before making the kebabs.
 
Just before making the kebabs add in the baking soda and mix the lamb mince till it gets sticky and holds it self together. It takes about 5/7 min of mixing to get great results.
 
The baking soda acts like a binding agent so no need to add eggs or flour to the mix.
 
Now all you do is form kebabs on the soaked wooden sticks.
 

Add oil to a non stick grill pan or even a regular pan and cook on medium to low heat.


Keep basting with the honey mix so the kebabs get a caramelized look and taste.
Cook by turning them frequently. That's all, now your done !


They are yummy guys !


Sunday, 28 July 2013

Peach and Apple Cobbler Cakes | Mini Cobbler Cakes with Peach and Apple


These cute mini peach and apple cobbler cakes get ready in no time and make a great dessert to show off, they also make a wonderful make ahead dessert for your tea party.
 
I prefer having  these mini cobbler cakes with the classic serving style which is plain old whipped cream, so comforting and delish.
 
Here is the recipe for mini peach and apple cobbler cakes :
I used 4 mini tart tins for this recipe
2 cups worth of chopped apple and peach (remove the sin of the peaches)
1/2 cup sugar ( add more if you wish)
1 tsp lime juice or rind
Mix the chopped apple,peach and lime juice with the sugar. Keep aside covered for 15 min.
Cook for 2 min in a microwave.
 
Batter
1 cup flour
1/2 tsp baking powder
less than 1/2 tsp salt
2 tsp sugar
1/2 cup milk
2 tsp melted melted butter + 1 tsp butter for each tart tins


Mix the flour, baking powder,sugar and salt together.
Slowly add in the milk to form a paste, add more milk if the batter is too thick. Last add in the melted butter. Do not worry if there are lumps, it is fine to have a lumpy batter for cobbler cakes.
 

Pre- heat oven to 175 c, after 10 min add in the 1 tsp butter in each tart tins, place in the oven till the butter is melted. Remove from the oven and pour in the flour batter equally in each tin.
Do not stir the batter around, now spoon the cooked fruit on top of the batter. Again Do Not Stir.


Bake at 175c for 15/20 min or until the tops look light golden brown.
Also check if the inside is cooked by inserting a tooth pick and it comes out clean.
Rest for 10 min before serving.


Delicious peach and apple cobbler cake is ready, serve these warm or cold.
Do not forget the whipped cream guys. Happy eating !

Friday, 26 July 2013

Fish Curry Cooked In a Clay Pot | Clay Pot Fish Curry


 Fish curry cooked in an earthen clay pot tastes so authentic and is every malayalis favourite with a steamy bowl  of rice on the side.

Today im sharing a recipe I saw on a cooking show and it turned out yummy, I found the flavours very different from the fish curries I have eaten so I just had to share it.
Try serving this fish curry with idlis, dosas or even rice roti's for a change, im sure your family will love it.
Oohh and ofcourse you still can make it in your regular pan instead of a clay pot. It will still be great I promise you.

I used 3 medium sized mackrels ,cleaned and cut.
1 tomato
1 onion
2 soaked dried red chili
4/5 garlic and ginger crushed
1/2 cup grated coconut

Spices
2 tsp Kashmiri red chili powder
2 coriqnder powder
1 tsp fennel seeds

Tempering
1/2 tsp mustard seeds
few curry leaf
few fenugreek seeds
2/3 chopped shallots
1/2 tsp red chili powder

1 tbs tamrind paste
salt to taste

Start by adding oil to a pan and add in crushed ginger/ garlic,chopped onion and the spices, cook for 2/3 min and then add in the tomato. Cook till the onion n tomato is soft and mushy.

Now grind the coconut along with the soaked red chili and the onion tomato paste. You will get a bright red paste.

In the same pan you cooked the onion add in a little oil and the ground paste, salt  and cook for 2/3 min, by doing this the paste gets a more flavourful. Add in 2 cups water and wait for a mild boil.

Add in the fish pieces, tamrind paste and cover for a few min.

Cook the fish pieces on a medium heat and then check for seasoning. You can add more water or keep the gravy thick.

Once the gravy is done add in oil into another pan and make a tempering, make sure you fry the shallots till brown.

Pour the tempering into the curry and cover with the lid for 10 min.

Delicious clay pot fish curry is done ! Serve warm with rice and enjoy !

Tuesday, 23 July 2013

Peach Lemonade (peachy lemonade) | Refreshing Peach Lemonade


Here is an easy peach lemonade to refresh you on sunny days when you just need some yummy drinks to cool you off, I can have this all day long and I promise you as soon as you  take a sip you will be one happy person !
This is my must have drink to beat the heat in Dubai !
 
 To make 4 large glasses :
2 large yellow peaches peeled and cut
3 medium size lemons, juiced (remove the rind from 2 lemons)
6 tbs sugar or more it just depends on your taste
a pinch salt
Ice cubes to fill the pitcher
Water/ Peach fizz/ Soda to fill the glass

Start by boiling the peaches with the lemon rind and sugar with 3 cups water.
 
 Make sure you boil it on a medium flame, stir in between.

You will notice a syrup forming in about 5/7 min and the water will be reduced to about 1/1/2 cups.
 Strain the peaches not leaving any of the peachy goodness. Allow to cool for about 10 min.
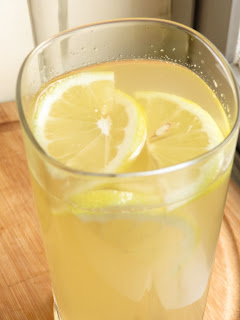
 Once cooled add the syrup to your pitcher and fill with ice. Pour in the lemon juice and fill with soda, any flavoured fizz or water. I always like adding lemon slices in each glass for my guests, they look and taste all the more great like that.
That's it guys ! Drink away !


This was my glass of yummy peach lemonade to make me a very happy girl !

Monday, 22 July 2013

Tadka Chole (tempered chickpeas) | Tarke Wala Chole


Tarka / Tadka Chole means tempered chickpeas,  this dish is flavoured with ghee and spices and tastes so different from the usual chole we are used to cooking.
Here's the easy recipe you guys !

Ingredients
1 cup chickpeas
1 onion, 3 garlic and ginger made into a paste
1 tomato pureed
1 bay leaf
1/2 tsp sugar
1 tsp red chili powder

For the Tempering
2 tsp Finely cut ginger
2 slit green chili
1 tsp kasuri methi
3 tsp chole masala
1 tbs ghee
1/2 tsp garam masala

salt to taste

1.Start by soaking 1 cup chickpeas overnight.

2.Pressure cook the soaked chickpeas with turmeric, salt, black cardamom and 1 tsp baking soda for 3 whistles.You can add a tea bag for a dark brown colour but I skipped it.

3.Add oil in a pan and saute the onion paste with the bay leaf till pink, add in the sugar and some salt cook for 2 more min then add in the tomato puree. Cook for 5/7 min on low.

4. Once the tomato and onion mix is cooked add in the drained chickpeas, keep the water in case you want a gravy for later. Mix the chickpeas well and cover for 2 min.
5. After 2 min place all the ingredients except the ghee listed under tempering on top of the chole.
Do not mix it yet.
 
Heat the ghee and pour on top, make sure the ghee is really hot.
Now mix in really well so everything is well coated.


Now your done, add water for a little gravy or keep it dry.
serve with onion and puffy puris.

Hope you try out this delicious chole puri, you will enjoy it for sure !!

Sunday, 21 July 2013

Never Fail Dinner Rolls / Buns Recipe | Best Recipe for Dinner Buns / Rolls

 
If you are looking for super soft and easy dinner rolls then this recipe is for you, these rolls also stay soft for up to 2 days if kept wrapped, that's why this is my go to recipe everytime.
 
Once you perfect these dinner buns recipe you can create new recipes adding additional ingredient's and make stuffed buns, raisin buns and even savoury cheese buns.
 
# Basically the main tip for making dinner rolls soft and moist is in the kneading process so use your blender / kitchen aid or your hand but make sure you knead it till the dough is completely elastic and does not tear easily when pulled.
 
 
# Another step is to allow the dough to rise longer after the second proofing, by doing this you will have an extra soft interior and you will never have uncooked or chewy buns.

# Most important thing is to never add yeast to very hot or cold water, yeast will get activated only if the water is warm along with sugar added. Very hot water will kill the yeast.
If your yeast mixture has not become foamy and frothy throw it away and try again.

So here is the easiest recipe for super soft dinner rolls / buns which never fails to impress.
Make sure all ingredient's are room temperature.
3 cups all purpose flour
2 tsp milk powder
1/2 cup milk
1/2 cup water
1/4 cup oil
1/4 cup sugar
2 tsp yeast
1/2 tsp salt
1 egg
sesame seeds to add on top
milk or egg for brushing on the buns

> Start by mixing the salt, milk powder and all purpose flour in a bowl.

> Heat the water and milk with half of the sugar  in the microwave for 1 min, add the yeast now allow to foam for 5 min.

> Take your blender and then add in the oil, egg, the yeast mixture and the remaining sugar.
   Give it a whisk.

> Add in the flour mix a little at a time till combined and well mixed in the blender. Mix well for 5/7 min if using your blender or knead for 10 min by hand.

> Remove from the blender then combine well and form a round ball, make sure you use a firm hand and smooth out the top.
Place it in a well oiled large bowl to double in size in a warm place for 1 hr.. Cover with wrap.

 
 After the dough has doubled punch it and form balls, place it on a greased tray.  Allow to rise again for 2 hrs.. Once again cover it with wrap so no crust forms and the dough stays moist.


After 2 hrs. your dough will be more than double this is exactly what you want for perfect soft buns, that's why I insist on letting it rise for 2 long hrs.

Pre heat oven to 175 c for 15 min before baking.
Brush the top with milk or egg and sprinkle sesame seeds on top. Now it is time to bake them.
Bake at 175 c for 25 min or until you have a beautiful golden brown top.


As soon as you are done baking brush with butter on top, please do not skip the butter.
Allow to cool for 10 min before serving.


Check out the texture inside..ohh yesssss it was super moist and pillowy soft.
This dinner roll recipe will never ever fail you it is a promise, just follow the steps and you will have the softest rolls/ buns everytime.
Hope you give it a try and let me know !!

Saturday, 20 July 2013

Tandoori Chicken in Makhni Gravy (Murg Makhni) | Homemade Tandoori Chicken Gravy

This recipe is the best i have tried for Tandoori Chicken and Butter Chicken, the spices are right, the flavours do not over power and it tastes totally like take away from a restaurant.

I added the Tandoori pieces into a smooth and luscious makhni gravy and dinner was ready.
We had it with Naan and also with some fragrant basmati rice. Totally Divine !

Keep reading to get the recipe for restaurant style Murg Makhni made at home.


Here is the recipe for Restaurant Style Tandoori Chicken


Click to view the recipe for Butter Chicken (Murg makhni)


Allow the dish to rest at least 20 min before serving so all the flavours get happy and come together beautifully.
Related Posts Plugin for WordPress, Blogger...