Cooking videos in here

Cooking videos in here
Click the pic to go on my YouTube Channel

Saturday 31 August 2013

Ciabatta Breakfast Sandwich with Mexican Style Omelette


Ciabatta breakfast sandwiches are great to serve as a weekend brunch, we mostly have them stuffed with Mexican style omelets and a big glass of any mixed fruit smoothie, this keeps us full in case we wake up late and want to skip lunch.
 
I do not add too much cheese but of course you can try it with your favourite mix of  cheese for some cheesy goodness and you can also skip toasting the ciabatta.


You need : serves 2
3 eggs - I remove the yolk of 1 egg and use only the white
1 ciabatta bread
1 cup mix peppers
1 tbs chopped black olives
2 tsp Mexican spice mix
1 small onion chopped
1 tsp chopped garlic
1 tbs chopped coriander
1 tsp flour
1 tsp mayo
pepper and salt to taste
 

 Add some olive oil to a pan and saute the onion, peppers till soft, add in the seasonings and the coriander leaves. Once everything is soft add the olives and give it a final mix.
 
 
Tips for making omelettes extra special.
I always add in flour while making these omelettes as they hold their shape better and do not break while flipping. Adding mayo to any omelette is also a great way to get a creamy taste so instead of adding milk try adding a tsp of mayo next time.

Whisk in the salt pepper, flour and mayo to the eggs.

 
Pour over the veggie mix and cook on a very low heat. You can also finish cooking the dish in the oven so the eggs are set. I cooked mine in the pan itself.
After 5 min on low gently flip, do not worry as the flour acts like a binding agent so the eggs don't break, cook another 2/3 min on the other side.
Cut into 4 pieces to stuff the Ciabatta.

Now all you do is cut the Ciabatta in half , spread the inside with butter and the cut omelette, close with the other half of the bread and lightly toast it.

I used my sandwich press for 2 min. Now your done, serve with salsa and sour cream and eat away !
 
Happy weekends always start with happy breakfasts !


Wednesday 28 August 2013

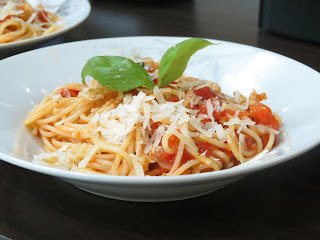
Classic Cherry Tomato and Basil Spegatti | Tomato Basil Spegatti


Last year on my holiday to Italy all I did was eat pasta and pizza, yes I was in heaven and be it Rome, Venice or Pisa every place I ate blew my mind away. I so need to go back !
 
Now everytime I make pasta I somehow feel I am missing out something and I just do not enjoy it until I got hold of the most classic, ridiculously easy and perfect recipe for cherry tomato and basil spegatti. If you love the classic Italian pasta which has the most simple and fresh ingredients then give this one a try, you will be smiling and will continue smiling for a long time I promise you.
 
Please try it you guys !
 
 
You need (for 2)
1/2 packet spegatti
1/4 cup freshly grated parmigiano reggiano  (only use freshly grated)
6 cloves garlic chopped
1tbs extra virgin olive oil to marinate the tomatoes
6/8 fresh basil leaves
2 tsp or to taste freshly grated pepper
1 tsp sugar
salt to taste
2 cups cherry tomatoes
1 tsp chili flakes
1 tbs regular olive oil to cook
 
 
Start by marinating the tomatoes with extra virgin olive oil, sugar, 2/3 basil leaves and 1 tsp salt.
Cover the bowl and keep it in the fridge for 2 hours, if you plan to cook it immediately at least give it 15 min to marinate in room temperature.

When you are ready to cook start boiling a pot of water and add in salt and a little oil, wait for a boil and then add in the spegatti. Cook according to instructions, mine took 9 min.

For the Sauce !
Add in regular olive in a pan and saute the garlic only till fragrant, quickly add in the marinated tomatoes and cover with a lid. The tomatoes will burst open and create a sauce so keep it covered for 4/6 min on a low heat.

Open the lid and saute for a min, add in salt, pepper and tear in few basil leaves.at this stage check for seasoning and add in salt, chili flakes and more sugar to balance the flavours.
You may cover it and cook for 2/3 min more if you want it completely mushy.

By now the spegatti will be cooked so drain it and add it to the sauce and toss to coat.
Serve it on a warm plate so it stays nice and hot, garnish with basil and the parmigiano.
You can also drizzle some extra virgin olive oil for some more flavour if you please.

Now your done ! Please serve it immediately !


Tuesday 27 August 2013

Fish Pulao / Pilaf


Here is a very simple pomfret and vegetable pulao packed with flavour. What I like about this dish is the mild flavour and also that you do not need any side dish to go with it.

You can cook it in your rice cooker or even on a stove top like I did. I'm sure your going to love it.


I used 4 pieces of cut pomfret and 1/2 cup basmati rice.
For spices
1 tsp red chili powder
1 tsp turmeric powder
1 tsp coriander powder
1 onion , 4 garlic cloves and ginger boiled and then made to a paste
2 tsp garam masala
1/2 cup mix veg chopped
1 sea food stock cube
2 cups water

To marinate the pomfret
2 tsp ginger/ garlic paste
1 tsp red chili
lime juice
salt to taste
1/2 tsp pepper

Marinate the pomfret after washing it in cold water a few times. Mix in all the spices and let it sit for 20 min. Then shallow fry the fish till light brown.

For the rice its best to soak the basmati for 15/20 min, then in a saute pan add oil or ghee and tip in the onion paste and the dry spices, cook for 5 min on low then add in the mix veg and the rice.

Saute the rice and veggies in the spices for 4/7 min on low heat making sure not to burn it, by doing this you will be sure to get fluffy and separate rice everytime.

Now add in 2 cups water and the stock cube, turn up the heat and wait for a boil.

Check for salt at this stage. Keep in mind the stock cube is already salty.

Once the water starts to boil keep the flame on low and cover with a tight lid. Let it cook for 15 min.

After 15 min open the lid and add in the fish pieces, you can now shut the flame off and allow the fish to stay in the pan for 5/10 min before serving.

If your using your rice cooker follow the same method but at the stage you add the stock cube and water simply put everything in your rice cooker.

That's all, now your done !

Monday 12 August 2013

Pumpkin Curry with Coconut

Here is a mild coconut based pumpkin curry that is eaten mostly with rice, if you are not found of the mild sweetness of the pumpkin you can add in a little more of green chili to alter the taste.
 

Try this amazing curry as your next lunch with some butter milk on the side and you are set to go.
Here's what you need !
2 cups yellow pumpkin chopped
1/2 cup coconut milk
1 green chili + 1/2 inch ginger paste
few fenugreek seeds
1 tsp mustard seeds
4/6 curry leaf
1 tsp hing
2 whole red chili - tear them if you want the gravy to have a spicy taste
1 tsp turmeric
1 tsp coriander powder
salt to taste
 
Start by boiling the pumpkin with turmeric, coriander powder,green chili/ginger paste,salt and 1 cup water. , I like the gravy to be a bit thick so I add less water, you can adjust it to your taste.
 
Keep the pan covered on medium heat and allow the pumpkin to get a little tender, check it after 5 min. Once the pumpkin is tender add in the coconut milk, boil for 5 min again.
 
You can cook it further if you want it mushy but I think this curry tastes best if you keep the pieces tender yet not falling apart.
 
Now in another pan add oil and add in the hing, mustard seeds, fenugreek, whole chili and curry leaf. Cook for a min and pour over the  curry.
 
Cover with a lid for 10 min. Pumpkin curry tastes best if served at room temperature.
 

 Now your done ! Serve with rice.
 

Saturday 10 August 2013

Fresh Fruit Cake with Homemade Whipped Cream

Its my baby sisters birthday and just like every year she has turned 21 again.
Me and hubby decided to celebrate her birthday by having a simple fruit cake with fresh homemade whipped cream, it was the perfect dessert for a hot summer day.

I tried this recipe with my Sponge cake with one egg recipe today but you can also try my other sponge cake recipes like the Eggless milk powder rose cake or the Eggless orange blender cake.


All you need is :

1 medium sponge cake freshly baked is best

Any mixed fruits of you choice, I used strawberry and blue berries

Whipping cream -  It must be chilled

Powdered Sugar to taste - to be mixed with the whipping cream

Any fruit juice of your choice, I used pineapple.

Tips to make whipped cream at home.

Take the steel bowl in which you will be whipping the cream and keep it in the fridge for 10 min.
You can also place the bowl on top of ice while whipping so the peaks form quickly.

Use your hand mixer on low speed then go to a high speed.

You can also chill the beating hooks along with the bowl for a even quicker result.

Always use chilled whipping cream.

Okay back to the fresh fruit cake !

> Whip the and cream till soft peaks form, then add in the sugar. Beat again till stiff.
> Keep it in the fridge for 10/15 min.
> In the mean time chop the fruits and cut the cake in half.
> Brush the sliced cake with the pineapple juice and then add the cool whipped cream.
> Top with fruits and then cover it with the other half of the cake.
> Last cover the entire cake with the freshly whipped cream and decorate with fruits.
> Place it in the fridge for 1 hour before slicing.

Now your done !


Thursday 8 August 2013

Sweet Vermicelli Recipe for Eid | Eid Desserts

Sweet roasted vermicelli is a delicious sweet dish made mostly during Eid, there are many ways to prepare this dessert but I prefer this vermicelli very soft instead of separate.
There are also different toppings that you can add and the common ones are mawa/ khoya, dry coconut and silver foil.
 
 
So here the recipe for a quick Eid dessert.
 
1 cup fine vermicelli
1 cup sugar (add more or less to your taste)
1 tbs ghee
1 tsp cardamom powder
1/4 cup chopped dry fruits
2 cups water
1/2 tsp rose water
Silver foil for decoration
 
Start by adding the ghee to a nonstick pan and brown the vermicelli on a very low heat, make sure it does not burn. Once its brown remove it with a slotted spoon so there is ghee left in the pan.
Keep it on a plate to cool for 5 min.
 
In the same pan fry the dry fruits and then add in 2 cups water along with the cardamom powder.
Once the water is about to boil add in the brown vermicelli and the sugar, cook on a medium heat and cover for 2 min if you want it a bit soft a slightly mushy.
 
If you want the vermicelli to be separate do not keep the heat on low and allow to cook without a lid, once the sugar dissolves and the water has dried your dish is ready.
 
It is best of you remove it from the heat and place the vermicelli on a plate for 2/3 min before serving. Most of the time there is a tendency for vermicelli to get very mushy if kept in the same pan.
 
Decorate with silver foil and then your done !
 

Thursday 1 August 2013

Raisin Cinammon Rolls (never fail cinammon rolls)


If you are nervous to make cinnamon rolls and like every home cook you want this to be a hit in your family all you do is follow this recipe, I was in shock the first time I made it, they came out so wonderful and pretty looking .
I stared at them for a while and then I had to stop as my hubby came into the kitchen.
 
 
Making a recipe work makes me so happy and its like I got an award or something.
This is the second time I made these but I wanted a change so I added rum soaked raisins and orange zest, adding fresh zest makes a world of a difference.
 
Making dinner rolls / buns is a very simple thing to do, just make sure you always give it more time after the second rise so they get poufy and big. If the recipe says 1 hour I give it 2.
Some how this works every time for me. `
Here is what you need for never fail raisin cinnamon rolls.
1/2 cup water
 1 cup milk
1 egg
2 tbs sugar
1/2 tsp salt
1 heaped tsp instant yeast
1/2 tsp baking powder
1/2 tsp baking soda
4 cups bread flour or pastry flour
1/4 cup rum soaked raisins
1/4 cup soft butter
 
For the filling
2 tsp soft butter
 
Mix together
1/3 up brown sugar
1/2 tbs cinnamon powder
1/2 tsp orange zest
 
Glaze - whisk together
 2 tbs cream cheese
2 tsp powdered sugar
1 or 2 tsp milk to make a runny glaze
 
 Use 2 baking trays -  1 for placing the rolls and one tray  to put the roll tray on, this helps in getting an even baking and prevents the bottoms getting burnt.
 Lets start !
 
# Add the water mixed with 1 tbs sugar in the microwave for 10 sec and put in the yeast, let it stand for 10 min, the mix will turn frothy, this is a sign the yeast is active.
 
# In another microwavable bowl add in the milk, half of the butter, salt and the other tbs of sugar, heat for few seconds only, mix in the yeast mixture with the milk mixture.
 
# Now take a large bowl, big bowls are always good for kneading if you using your hands.
 
# I used my mixer to make the dough. Add in the flour, baking soda and baking powder, give it a whisk. Add in the yeast and milk mixture a little at a time.
 
Once the mixture is almost coming together add in the raisins, add in the rest of the milk mixture and complete making the dough.It will be a little sticky, but that is ok.
 
# Use your hands if you are using a mixer and smooth it out, make a ball and coat with butter.
Add this dough ball to a greased bowl and allow to rest for 1 1/2 hr.
 
# After 1 1/2 hour the dough will double in size, this is a great sign.
 
 
# Take the dough and roll it into a log shape, then using a rolling pin spread it out into a rectangle.
Brush with soft butter and then spread the cinnamon ,orange zest and sugar mix evenly.

# Roll it like a jelly roll and then cut into 1 inch rounds.

 
# In the baking tray add a baking sheet and place them to rise again.

 
# Allow to rise for 2 hours again, I also tried making some with a jam filling.
As you can see the pic above the rolls are more than double.

Pre- heat the oven 20 min before baking at 175 c.
 
Bake at 175 c for 25 min. Drizzle with the cream cheese glaze while the rolls are still hot.
I was so excited that I ate one as soon as they came out.

 
That is it guys, get your cup of coffee and enjoy !


You can skip the raisins and make plain cinnamon rolls, this is a basic dough recipe and it always comes out perfect that's why I call them never fail cinnamon rolls.
Happy eating you all !!
Related Posts Plugin for WordPress, Blogger...