Cooking videos in here

Cooking videos in here
Click the pic to go on my YouTube Channel

Sunday, 30 June 2013

Malwani Style Pomfret | Malwani Fish Fry


Here is my mama's malwani style fish fry, totally delish and so quick to make.
We used white pomfret but you can use any fish of your choice, it tastes great even with king fish.
Most of the time the fish is coated in semolina before frying in most malwani recipes but we skipped it, you can try it with the coating for a nice crunch.
 
Here's the recipe you all ! 
 
 For 5 large pomfrets :
3 tbs malwani masala
2 tbs garlic paste
2 tsp oil
2 tsp tamrind paste
2 tsp gram flour
salt to your taste
 
Mix all the above ingredients well.


Make slits on the fish and marinate for 2 hours. Then shallow fry till light brown.
Now your done ! Serve hot and enjoy !


Friday, 28 June 2013

Crispy Baked Chicken Drumsticks | Crispy Chicken Drumsticks without Frying


Ohh my God, I seriously wanted to jump after I tasted these super crispy and to die for chicken drumsticks, reason is I always thought that no way you can get such amazing results in an oven and that too keeping the inside moist and the out side coating so crunchy and crispy with out deep frying.
 
Here is the best ever recipe for no fry chicken drumsticks that taste better than fried chicken.
 
 
I regret making only 5 pieces, seriously I had no hopes in making this recipe work , but it did ! yayy!!Now I cannot wait to make some again this week.
 
 
For 5 large drumsticks I used
Marination : Do not add salt while marinating the chicken as it releases water.
Thick yogurt 2 tbs
Honey 2 tbs
Pepper 1 tsp
1 tsp melted butter
Marinate the chicken overnight.

Coating
1 1/2 cup flour
1 tsp baking powder
4 tsp lemon pepper seasoning


Once you are ready to make the drumsticks, drain out the excess marination and coat with 1/2 tsp salt, you can add chili pepper too if you want.

Coat the chicken with the dry mix and then place the chicken on a wire rack brushed with oil so the chicken wont stick, place the rack on top of a baking sheet, this helps in getting the chicken crispy and evenly brown.


Chill the chicken for 15 min in the fridge and in that time preheat oven to 200 c.

Drizzle very little oil on top of the chicken on both sides.

After 15 min reduce the temperature and bake at 180 c for 30/ 40 min turning the tray once so it bakes evenly, then grill at 200 c for 10 min.
Please note grilling and baking time my differ with different ovens. So please watch out.

Now your done guys !!


Thursday, 27 June 2013

Easy Thai Ice Tea Recipe | Thai Tea Recipe

This is one of my favourite drinks to have during summer and I make it at least once a week to cool me and hubby off, and I always make a bit extra and  freeze it so I can have Thai Ice Tea Slush which is another one of my fav.

I prefer making the ice tea from scratch and not the store brought tea blend.
After trying out different versions of Thai tea I prefer this recipe and I stick to it.

Note : This is how I do it, it maybe not the authentic recipe, but it tastes exactly like you get it Thai restaurants.

Here's the easy recipe for the perfect Thai Ice Tea in your own kitchen.


         Don't you love the pretty swirls !!

 
 In 3 cups water add in some lemon grass, 1 cinnamon stick, few cardamom pods crushed and star anaise. Boil for 5 min.
 
 After 5 min add in 1 tsp of strong tea leaves, you can add more if you like it strong.
 
 Boil for 2/3 min max then add in 2/3 tbs sugar or adjust to your taste.
Now allow it to rest for an hour. By doing this you slowly infuse the tea flavour and you do not end up with overly bitter tea concentrate.
 
 Strain the mix and pout into a tall glass filled with ice, do not pour it completely.
 
Just about more than half a glass, the colour has to be a deep sunset golden.
 
 Now add in a little condensed milk.

 
And last add in evaporated milk, you can also add in regular milk but for the real Thai Ice Tea experience you need evaporated milk.

Check out the beautiful swirls then mix in with your straw and sip away.

Now your done, do try it out you guys !

Tuesday, 25 June 2013

Eggless Tiramisu (step by step tiramisu recipe)

Making eggless tiramisu is what I always prefer as I feel it is much safer even for people with allergies and also for those who do not eat eggs, you must must must try out this easy recipe and I know for sure you will be making it very often after you get a taste of it.
 
It is my favourite dessert and no one can make Tiramisu better than my sister, it seriously tastes better than any restaurant, no jokes !
 
Here is her no fail tiramisu recipe !


All you need is :
                              
Italian lady fingers (not the sponge cake)
 
Strong coffee 3 cups (I make a little extra in case I need more)
 
2/4 tsp or more rum
 
Heavy Whipping cream, keep it cool in the fridge
 
Mascarpone cheese 1 regular pack
 
Less than 1/2 cup super fine sugar 
 
Good quality cocoa powder for dusting
 
 
Make sure your coffee is strong, cool it completely and add in rum.

Whip the cream adding half the sugar and then cool it in the fridge.

 
Cream the mascarpone cheese with remaining sugar and add in half of the whipped cream, mix well.
Do not over mix.

 
Add in the rest of the whipped cream and combine, over mixing will not give you a light airy texture so be very gentle.


Dip each lady finger into the coffee and rum mixture then line into a rectangle baking tray, it is much easy to remove if your tray is a square or rectangle shape.
 
Spread the top with the cream mixture, then again top it with another layer of soaked lady finger and spread with the cream mixture.
You can make 2/3 layers. We made just 2 layers.
 
Once you finished making the layers, dust with the best quality cocoa you have.
Then cover with cling wrap and chill for 6/8 hrs.
 

Now your done, just cut and serve.
 

Saturday, 22 June 2013

Pita Pizza with Sausage and Pineapple (easy snack ideas)

Try these quick sausage, pineapple and olive pizza on days when you need a quick snack which is tasty and can also keep you full. I mostly keep pita bread at home to make pita chips, roll ups, a sandwich and pizza of course. You must too, they are very versatile.


These easy pita pizzas also make a great after school snack and even as a quick breakfast pizza with more veggies and a fried egg on top.
 
Here's what you need :
3 pita breads
pineapple cut in chunks
sausage cut into pieces
olives
bell peppers marinated with salt and pepper
pizza cheese
mixture of a olive oil, butter and Italian herbs for brushing on pita breads

Pre heat oven to 180 c, then brush pita bread with olive oil and butter mixture. Add the toppings and then last add the cheese.

Bake on 180 c for 10 min, then broil for 5 min at 200 c.

Now your done !


Wednesday, 19 June 2013

Alu Matar Curry (potato and peas curry)


This is a very simple alu matar gravy which can be served along with rice, most of the time alu matar is prepared as a dry dish which is eaten with roti's, but today I thought of making a rasawala (gravy) alu matar to go along with jeera rice and some thick raita.

Here's what you need :

2 large potatoes cut in medium size cubes
1 cup peas
Boil the potato and peas for 4/5 min, add in 1/2 tsp rock salt and 1/2 tsp turmeric to the water.
They do not need to be cooked completely, by boiling them for 4/5 min they retain their shape when you cook them later with the other spices.

2 large tomato pureed with 4/5 garlic, 2 green chili and a small piece ginger
1 large grated onion
1 tsp turmeric
1 tsp cumin seeds
1 tsp kalonji (nigella seeds)
2 tsp coriander powder
1 tsp red chili powder
1 tsp chaat masala
1/2 tsp kasuri methi
1/2 tsp sugar and salt to taste

 
Start by adding 2/3 tsp oil in a pan and add in the cumin and kalonji, then goes in the grated onion.
Cook on low and allow the onion to get transparent, now add in the dry spices and cook for 2/3 min.

Now add in the tomato puree, sugar and salt. Cook till almost dry, it will take 5/7 min.

At this stage add in the boiled potato and peas, do not throw the boiled water, keep it for later.

Saute the potato and peas in the masala paste for a few min then add in the reserved water.

Allow to boil then cover with a lid and cook till potatoes are soft !
Add kasuri methi in the end and serve with puris or rice.


Monday, 17 June 2013

Mumbai Style Veg Pulav/Pulao | Mumbai Style Chatpata Pulao

Mumbai Style Pulao/Pulav has a very tangy, a bit sour and spicy taste.
The main spice mix is pav bhaji masala,what i love about this dish is the aroma and how all the flavours stand out with this aromatic blend of masalas.
 
Here's the easy recipe you guys !


The star of this dish is Pav Bhaji masala and lots of butter.

Here are the other list of ingredients you need
 
1 cup cooked basmati rice (boil it then drain out the water, cool completely)
3/4 tsp pav bhaji masala
1 tsp red chili powder
1 cup mix veggies of your choice
1 onion
2 medium size tomatoes pureed
2 tbs ginger garlic paste
small pinch kasuri methi
1 tsp cumin seeds
2 tbs butter or more to your taste
salt to taste

Start by adding butter and a bit oil to a pan, add the cumin seeds and saute a min, add in the ginger garlic paste and cook on low for another min.

Now add in the onion and the red chili powder, cook till a bit soft. Now add in the tomato puree and cook for 2/35 min. Add in mix veggies and saute next add salt, pav bhaji masala and kasuri methi.

Cover and cook for 5/7 min till the veggies are soft.

Once the veggies are cooked add in the cooled rice and gently toss.

Check for salt and add more if needed. Serve with butter on top.

Now your done !!!

Chatpata Mumbai Style Pulao is ready.

Sunday, 9 June 2013

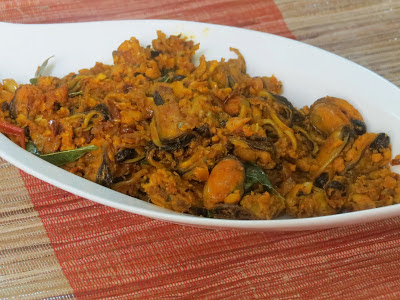
Kerala Style Mussel Fry (kallumakai fry)

Mussels (kallumakai) are a delicacy in the north Malabar side of Kerala, they are made into a curry, fried, steamed and even cooked as a spicy biryani.
My mom prepared them for lunch today and they turned out crispy a bit spicy with a hint of thick coconut milk, they were just amazing.

This dish also happens to be my most favourite side dish along with rice and lentils.

Here's the easy recipe for mouthwatering  Kerala style you guys !


Use fresh mussels for best results and make sure you clean them thoroughly.
For 250 g medium size mussels
 
Marination
1/4 tsp turmeric
1/4 red chili powder
salt to taste
 
For the masala
1 large onion chopped
6/8 chopped garlic
3/5 green chili slit
Few curry leaves
Small piece of tomato
1/4 tsp red chili powder
Small piece chopped ginger
2 tbs thick coconut milk


Marinate the mussels for 15 min, then cook with less than half cup water on medium heat

Once the mussels are cooked in another pan add in oil and saute the garlic, ginger and green chili.

Add in curry leaf and saute another min then add in the onion, saute till pink then add in salt and the red chili powder. Cook for 5 min then add in the tomato.

Saute for a few min till the tomatoes are cooked then add in the mussels.

Be gentle and add in the mussels , cook till completely dry and well coated with the masala paste.

Last add in the coconut milk and saute for  2/3 min more.

Now your done, serve hot and enjoy yummy Kerala style mussels.


Related Posts Plugin for WordPress, Blogger...